Lamington sponge fingers

Lamington sponge fingers

The timing for this post couldn’t be better – I needed to move on to foam-based sponges and it was Australia Day so what better cake to do than a lamington!

You can use any sponge base for a lamington, so I wanted to try out the much feared Genoise.

Genoise is named after its place of origin, Genoa in Italy. It differs from other foam-based cakes because it uses whole eggs to beat with sugar rather than just egg whites.

The eggs and sugar are beaten until they have “ribbon” consistency before flour is sifted, then gently folded into the mix. A small amount of melted butter is added at the end for flavour.

There seem to be two ways to make a Genoise – one which involved whisking the eggs and sugar in a bowl over a pan of simmering water to thicken the mixture. I decided to keep it simple and go without the extra step, but will try it in future posts.

I won’t lie and tell you my first Genoise experience was easy. In fact, I questioned myself throughout the whole process and still am not sure if I got it right.

There are a few places you can fall over. Firstly, you have to make sure you don’t over- or under-beat the eggs – too little won’t give the cake any rise, and too much will create large air bubbles that will pop in the often and give you a flat, dense cake.

Secondly, you need to make sure you don’t lose the air bubbles when you fold in the flour. Tips include sifting from a height, then using a spatula to gently fold in the flour.

It’s quite distressing because you can actually hear the bubbles pop as you stir and know that every pop is a slightly less fluffy sponge.

Lastly, make sure the butter has been melted and is then left to go back to room temperature. Otherwise, you’ll be mixing hot liquid into cold eggs so could get some scrambling.

Lamingtons themselves aren’t hard to make, but can be quite messy. You can make them in any shape you want – as a full cake (filled with jam and cream), as squares or as fingers like I have here.

There’s a lot of talk about using forks to dip your sponge into the chocolate mixture, but I find hands are the best way to go.

Also, try to leave you cake out for a few hours or overnight before dipping and coating. This can help stop the cake from crumbling.

Lamington sponge fingers

Genoise sponge lamington fingers (Genoise courtesy of Michel Roux)

20g butter, softened, to grease
125g plain flour, sifted
4 eggs, room temperature
125g caster sugar
30g butter, melted and cooled to tepid

2 cups desiccated coconut
3 ½ cups icing sugar
2 tbsp cocoa powder
1 tbsp butter, melted
½ cup boiling water

Preheat the oven to 190 degrees. Butter and lightly flour a sheet pan.

Whisk the eggs and sugar together in a bowl for about 12 minutes, until the mixture leaves a ribbon trail when you lift the whisk.

Shower in the flour and delicately fold it into the mixture.

Add the melted butter and fold in carefully, without overworking the mixture.

Pour the mixture into the prepared tin and bake for 15 minutes or until springy to the touch and a golden colour.

Turn the cake out onto a wire rack, cover with a tea towel and leave overnight.

The next day, mix together the icing sugar, cocoa, butter and water.

Cut the cake into fingers, then dredge in the icing and then coat with coconut.

Leave for two hours, then serve.

Happy Australia Day!! 🙂

Carrot cake with cream cheese frosting

Carrot cake with cream cheese frosting

So my last post about mayo cakes was a bit random, so I wanted to go a bit more classic with an oil-based cake.

Oil is often used rather than butter in fruit cakes because it manages to keep the cakes moist and light. It also has a longer shelf life so is great for cakes that develop their flavour over time.

And you won’t miss the butter flavour amongst all of the other rich ingredients.

Since carrot cakes are quintessentially American, I went straight to recipes from bakeries like Hummingbird and Magnolia for inspiration as well as Paula Dean and Martha Stewart.

All recipes were pretty similar with a few tweaks on spicing (cinnamon, ginger, nutmeg, mixed spice), fruits (raisins, crushed pineapple) and sugar (caster, light brown).

I ended up taking a bit from each recipe to cobble together this creation. It was incredibly moist and flavourful so I’ll definitely be trying it again.

The use of pineapple was a personal choice because I’m not a big fan of raisins in cakes, but I think it added a really nice zingy note.

It made quite a large batch and I managed to get a loaf and two round cakes out of it which is a bit greedy!

The icing was a basic cream cheese frosting with a bit of orange zest.

That’s it for fat-based cakes – next step is foam-based!

Carrot cake

300g caster sugar
300g plain flour
1 tsp bicarbonate of soda
1 tsp baking powder
1 ½  tsp ground cinnamon
½ tsp ground ginger
½ tsp salt
3 eggs
300ml canola oil
½  tsp vanilla extract
300g carrots , grated (roughly 2 large or 3 small carrots)
1 cup tinned crushed pineapple
100g shelled pecans , chopped

Pre-heat the oven to 170 degrees.

Whisk together the sugar, oil and eggs then set aside. In a separate bowl, sift together the dry ingredients.

Slowly stir the dry ingredients into the batter and stir together with a wooden spoon. Add the vanilla extract.

Lastly, mix in the carrots, pineapple and pecans so that they are evenly distributed.

Pour mixture into prepared tins (I made 2 x round cakes and 1 x loaf) and bake for 25 minutes (cakes) and 40 minutes (loaf).

Cream cheese frosting

Mix 1 250g packet of cream cheese, 3 cups of icing sugar and zest of 1 orange together until smooth.

Chocolate mayo cake

Chocolate mayo cake
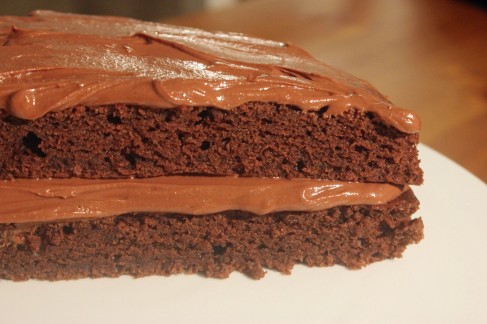
Chocolate mayo cake

When I was researching options for different fat-based cakes, I came across the obvious oil and butter options (oil recipe coming next week).

But I also came across another type that caught my eye – mayonnaise-based cakes.

It seems a bit odd, but when you think about it mayonnaise is basically oil, egg and vinegar. These ingredients listed our separately are more than home in a good cake recipe.

Most of the mayo cakes I found were chocolate cakes and they promised to be moist and delicious. So, I decided to give it a go!

I played around with a few recipes and came up with the ingredient list below. I added a cup of espresso rather than water used in some recipes, and ensured that I used both baking powder and baking soda to offset the acid.

Lastly, I added some salt to enhance the flavour of the cocoa.

The cake was incredibly moist, but I must admit that I did miss the buttery flavour and found there to be a slight aftertaste.

Still, it was an interesting experiment and might just be my opinion so think it’s worth a test yourself.

Chocolate mayo cake

1 cup espresso, cooled
1 cup whole egg mayonnaise
1 tsp vanilla extract
2 cups flour
1 cup caster sugar
3 tbsp good quality cocoa
1 tsp baking powder
¼ tsp baking soda

Preheat the oven to 175 degrees.

Sift all dry ingredients together in a bowl.

In a different bowl, whisk together all of the wet ingredients.

Combine the mixtures and stir together until smooth.

Pour into two lined cake pans and bake for approximately 18 minutes.

Fudge buttercream icing

180g dark chocolate, melted
250g butter, at room temperature
275g icing sugar, sifted

Beat the butter until it is creamy and add the icing sugar. Add the chocolate.

Vanilla layer cake with raspberry buttercream

Vanilla layer cake with raspberry buttercream

Cupcakes and pound cakes done – now it’s time for layer cakes before moving on from butter-based cakes.

Butter cakes are more dense than sponge cakes, so perfect for standing up to the weight of multiple layers of cake and filling.

I will admit upfront that my cake decorating skills are basic to say the least so please don’t expect pictures of jaw-dropping, architecturally designed creations.

According to Michel Suas, the key steps to cake assembly are splitting, filling, masking and icing:

  • Splitting – most cakes can be split into two of four layers.  Use a good quality serated knife to stop the cake tearing and wait until the cake is completely cooled. Cut the cake on a level surface and from one direction, turning the cake as you cut. The key to even, consistent splitting is ensuring that the angle of the blade is constant and doesn’t change direction.
  • Filling – first, you must determine which layer should be in which position within the assembled cake. The most damaged layer should be used in the middle so that you can hide the problems with icing. The flattest layer, usually the bottom layer flipped upside down, should be reserved for the top. Place the filling on the centre of the cake and drawn out to the edge with a palette knife. Ideally, use a cake turntable to ensure an even spread.
  • Masking – this refers to the process of putting a thing coat of icing over the sides and top of the cake. The purpose is to secure all of the crumbs so that none get into the icing. After cakes are masked, they should be placed in the fridge for at least 10 minutes.
  • Icing – as with masking, icing should be placed in the middle of the surface,  and then worked out to the edges with a palette knife. A n even layer should leave some icing hanging over the edges, and this can be used to ice the sides. After the sides are done, there should be some now extended above the surface, so these will need to be removed to create vertical sides and a flat top.

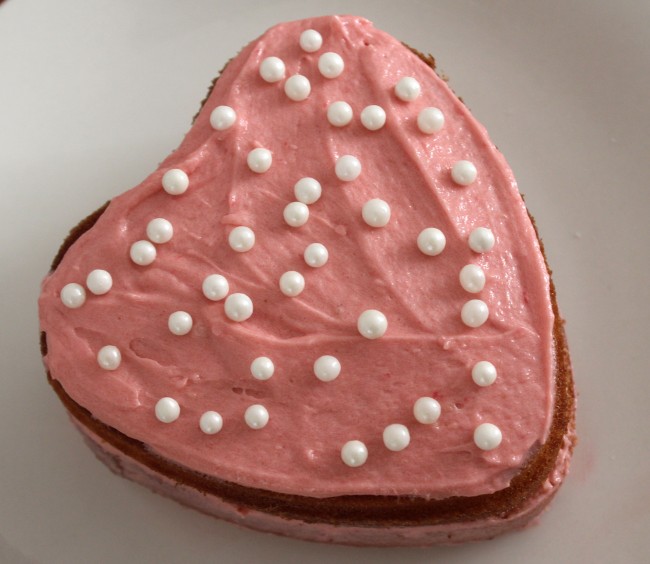
For this cake, I went for a traditional vanilla cake and sandwiched it together with raspberry buttercream made from fresh raspberry puree.

I admit that I didn’t get as far as masking, but will definitely try this later down the track when my technique is a bit better.

Vanilla layer cake with raspberry buttercream

Vanilla cake with raspberry buttercream

125g unsalted butter, softened
230g caster sugar
200g plain flour
1 tsp baking powder
1 tsp vanilla extract
3 eggs
½ tsp salt
185ml milk

1 cup butter, softened
3 1/2 cups confectioners’ sugar
1 teaspoon milk
1 cup fresh/frozen raspberries

Preheat oven to 180°C.

In a large bowl, on the medium speed of an electric mixer, cream the butter and sugar until very light and fluffy, about 5 mins. Add the vanilla and the eggs, one at a time, beating well after each addition.

Sift the flour, baking powder and salt into a small bowl and mix together. Gradually fold into the batter, alternating with the milk until completely combined.

Prepare a 20 cm cake tin (I used a heart-shaped version) and pour in the batter. Cook for 25-30 minutes.

To make the icing – heat the raspberries in a pan over a low heat until macerated. Pass through a sieve to remove all of the seeds. Mix together with butter, sugar and milk until smooth and creamy.

Note – these quantities make one cake which can be split into two or four layers. I like the appearance of three layers, so didn’t use the fourth layer.