Rich chocolate ice cream

Chocolate ice cream
Chocolate ice cream

After a few visits to department stores and consultation with a number of websites, I’ve realised there’s not much I can do about my ice cream making equipment.

All of the machines out there are pretty similar to what I already have (i.e. removable bowl that you freeze in advance then place into machine to churn), and the only real option is to upgrade to a full ice cream machine unit with a built-in freezer.

Did I say “real option”? Actually, there’s no chance I’m investing $400 into a machine that will only be brought out every couple of months – I made that mistake with my deep fat fryer that has been used once!

So, I’ve had to adapt to making ice cream in 30C+ weather which is what I’m in for over the next few months.

One tip I learned this week was making sure everything was as cold as possible before placing into the churner. Sounds really basic, but made a huge difference – I was adding room temperature liquid into a frozen bowl so automatically the bowl started defrosting.

Second, I placed the bowl back into the freezer for intervals of 30 minutes or so before churning again.

This managed to stop the ice crystal formation but also give the ice cream a chance to set.

Lastly, on the advice of a helpful shot assistant I blasted the air conditioning while I was making the ice cream to cool the room as much as humanly possible.

So after my so-so effort with vanilla ice cream, I wanted to give chocolate a try.

I know this is all very boring and basic to people who make ice cream regularly, but I’ve always believed that you have to master the basics before going off and getting creative. I guess that’s the whole purpose of this blog and this is all very new to me!

For a second time in a row, I used Michel Roux’s recipe but adding my own extra steps in lieu of a proper ice cream maker.

It worked out really well and managed to give me a properly formed and set scoop. It didn’t need any accompaniment and was still delicious a couple of days later. (although I don’t think I would have left it much longer)

I swear, I know this process takes time but I am yet to find a vanilla or chocolate ice cream that tastes as good as these. While the texture of my vanilla wasn’t perfect, the flavour was insane! And this chocolate ice cream delivered on both fronts.

So  next week is going to be moving on to sorberts, but I’ll definitely be practicing more ice creams behind the scenes and will share any worthy contenders with you.

Chocolate ice cream
150ml whole milk
150ml double cream
80g caster sugar
3 egg yolks
100g good quality dark chocolate

Pour the milk, cream and 50g sugar into a saucepan and bring to the boil over a medium heat.

Meanwhile, whisk together the eggs yolks and remaining sugar until pale.

Pour the milk mixture over the eggs, whisking the whole time.

Return the mix to the stove and cook over a low heat until it thickens.

Take off the heat and stir in the chocolate.

Cool over ice, then churn in the usual way. (this is where I would place the cooled ice cream in the fridge for half an hour or so).

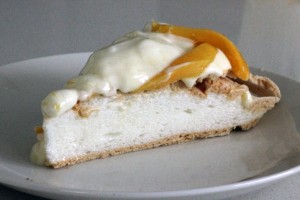
Mango and passionfruit yoghurt topped pavlova

Pavlova slice
Pavlova slice

Last week’s vanilla ice cream recipe left me with six egg whites leftover and how better to use them than with a pavlova.

Being Australian, we take our pavlova very seriously and I’ve grown up using the classic recipe comprising egg whites, caster sugar, cornflour and white vinegar.

Unlike meringues, you are looking to maintain a soft, marshmallow centre with your pavlova which is where the vinegar and cornflour come in – they stabilise the eggwhite foam and prevent it from collapsing.

When making pavlova, you need to follow the same tips as with regular meringues – only use clean, grease-free equipment, egg whites at room temperature and ensure there are no pieces of shell or yolk in the whites.

Also, wait until the whites are at soft peak stage before adding the sugar and incorporate one spoon at a time – test the mix by rubbing a bit between your fingers to ensure there is no grainy texture.

And most importantly, don’t forget to pile the pav as high as you can to avoid a flat disc coming out of the oven.

It will collapse as it cools and there’s no real way of knowing how much – I’ve had pavlova come out of the oven and stay perfectly upright, but others like this one crack and crumble a fair bit. Either way, it still tastes amazing so don’t worry too much!

There are many fantastic variations on pavlovas and I can definitely recommend Nigella’s chocolate creation topped with whipped cream and strawberries –

I wanted to use tropical fruit on mine, and opted for yoghurt rather than cream for a bit of extra tartness.

I love the yoghurt that comes with a fruity syrup swirl, especially the passionfruit variety which perfectly matches fresh mango.

This is going to be a perfect end to our family BBQ this afternoon.

Mango and passionfruit pavlova

Perfect pavlova recipe

6 egg whites
270g caster sugar
2 teaspoons cornflour
1 teaspoon white wine vinegar

Pre-heat the oven at 120C. Line a baking tray with baking paper, then draw on a 24cm diameter circle.

Whisk the egg whites in a clean bowl until you have soft peaks.

Add the sugar one spoonful at a time, then mix until fully incorporated and you have a glossy, smooth mix.

Add the vinegar and cornflour and mix again for one minute.

Use a spatula to transfer the mix across onto the baking paper then smooth the sides and the top.

With your finger, draw a circle an inch from the edge of pavlova top – this will help to prevent it cracking too much. Don’t worry if it does, you can always cover it with your chosen toppings.

Bake for 1.5 hours, then turn off the oven and open the door. Leave to completely cool in the oven.

Top with whipped cream of yoghurt and fresh fruit.

Classic vanilla ice cream

Vanilla ice cream
Vanilla ice cream

I’m quite excited to be taking this step into the world of ice cream.

I’m a huge ice cream fan and generally have a tub in the freezer for emergencies – although often it doesn’t last very long.

I’ve made homemade ice cream in the past but just followed a recipe without really understanding what was going on. And that’s where Project Pastry comes in.

First things first, ice cream is a churned frozen dessert which is a term also used to describe gelato, sorbet and frozen yoghurt .

They are constantly agitated during the freezing process, so break up the ice crystals as they form which results in a smoother texture.

Still-frozen desserts are prepared and then left undisturbed in the freezer until they reach a solid state. They include dishes like frozen mousses, frozen parfait, frozen soufflé, semifreddo and bombe.

Making ice cream can create a bit of a problem for some people for one of two reasons:

  • Access to equipment to help the churning process
  • Mastering the perfect crème Anglaise (the base of most ice creams)

I don’t have an ice cream machine as such – just an extra freezer bowl fitting for my stand up mixer which I’m afraid doesn’t do the job properly. It certainly churns the mix well, but I’m not convinced the ice cream was setting particularly well. I think this is something I’m going to need to rectify soon!

The second challenge, the crème Anglaise, has been something I’ve been working on for a long time and you can see my previous post for tips and tricks.

So to start myself off, I wanted to create a classic vanilla ice cream using a crème Anglaise custard base with just some double cream added at the end of extra richness.

I was interested to see how many options there are for flavouring during the stage where you heat the milk and infuse the vanilla. I could already see opportunities of using other enhancers such as cinnamon sticks, cardamom pods, lemongrass, cloves or ginger.

There would also be the option of adding tea during this stage to create green tea, chai or early grey ice cream.

I’ll delve into fruit ice cream next week but already getting excited because tropical fruits are coming into season and I’m already daydreaming about mango, pineapple or passionfruit delights.

Classic vanilla ice cream

1 quantity crème Anglaise
100 ml double cream

Make the crème Anglaise as per the instructions, then immediately place the mixture onto a bowl of iced water to speed up the cooling process.

Once cooled, pour in the double cream and remove the vanilla pod.

Churn in ice cream maker for approximately 20 mins, then transfer to a freezer-proof container and place in freezer until you’re ready to serve.

Brioche (and pain perdu recipe)

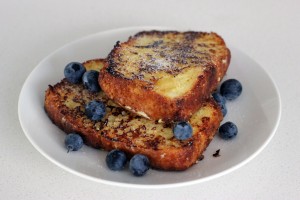
Pain perdu with blueberries

Brioche is probably the most well-known non-laminated viennoiserie and is a staple in French cuisine.

It’s basically an enriched bread dough with a high butter and egg content which makes the brioche very tender and rich.

We’ve all grown up hearing Marie-Antoinette’s famous line “Let them eat cake” but the actual correct translation was “Let them eat brioche” which is a bit less pompous (but still pretty clueless).

It’s extremely versatile and is just as commonly seen on a breakfast table as it is stuffed and served as a canapé or alongside a main course in place of a dinner roll.

Brioche à tête is the most traditional shape, where the brioche is formed and baked in individual fluted moulds. However, if like me you don’t have the appropriate baking kit, you can make a loaf by lining up balls of brioche in a loaf tin (more on the later).

I used Michel Roux’s recipe (http://www.redonline.co.uk/food/recipes/michel-roux-s-brioche-dough) and will admit upfront as I always do that I had a few issues.

While the finished product looked and tasted great, something definitely went wrong along the way.

My first mix was great – the dough was bouncy and came together well. However, once I added the butter it all seemed to go downhill.

Now I don’t know if temperature played a role somewhere because the dough never quite came back together again. I thought placing it back in the fridge would mess too much with the proofing/retarding process so let it sit in a warm environment as per the recipe.

I did some research and saw that some people melt their butter before adding to the dough so again I’m not sure what went wrong with mine. Does anyone have any ideas?

Either way, as I said it looked and tasted great, but was a challenge to form properly. I found this great video that showed how to shape brioche for a loaf (http://www.youtube.com/watch?v=suKgK1jCWCE) but my dough looked a lot wetter and there’s no way I could have created the little heads for the brioche à tête with this mix.

I’ll try it again in cooler weather and keep my fingers crossed.

Brioche loaf
Brioche loaf

Once I had my brioche baked and cooled, I wanted to make pain perdu. Again I looked to my hero Michel Roux for a recipe and found this one which was delicious!! I adapted it a bit because I didn’t have any crème fraiche.

Pain Perdu

250ml cold milk
50ml crème fraiche
30g caster sugar
1 whole egg, plus 1 egg yolks
140g Butter
50g extra sugar for sprinkling or 50ml maple syrup
Blueberries (my addition)

Mix together the milk, crème fraiche, sugar, egg, egg yolk and salt in a bowl.

Cut the brioche into slides, then steep in the milk mixture for 2 minutes. Turn them over and leave for another 2 minutes.

In a large frying pan, melt half of the butter and when it begins to foam, add the bread slices and the rest of the butter.

Fry until golden on each side, then serve with extra sugar and berries.